摘要
无论一个类设计得多么完美,在未来的需求演进中,都有可能会碰到一些无法预测的情况。那怎么扩展已有的类呢?一般而言,继承和组合是不错的选择。但是在Objective-C 2.0中,又提供了Category这个语言特性,可以动态地为已有类添加新方法。如今Category已经遍布于Objective-C代码的每个角落,从Apple官方的的framework到各个开源框架,从功能繁复的大型App到简单的应用,Category无处不在。本文对Category做了比较前面的整理,希望对读者有所裨益。
初入宝地-Category简介
Category是Objective-C 2.0之后添加的语言特性,Category的主要作用是为已存在的类添加方法。除此之外,Apple还推荐了Category的另外两个使用场景:
- 可以把类的实现分开在几个不同的文件里面。这样做有几个显而易见的好处:
- 可以减少单个文件的体积
- 可以把不同的功能组织到不同的Category里
- 可以由多个开发者共同完成一个类
- 可以按需加载想要的Category等等。
- 声明私有方法
不过除了Apple推荐的使用场景,广大开发者脑洞大开,还衍生出了Category的其他几个使用场景:
- 模拟多继承
- 把framework的私有方法公开
连类比事-Category和Extension
Extension看起来很像一个匿名的Category,但是Extension和有名字的Category几乎完全是两个东西。Extension是在编译器决议,它就是类的一部分,在编译期和头文件里的@interface以及实现文件里的@implement一起形成一个完整的类,它伴随类的产生而产生,亦随之一起消亡。Extension一般用来隐藏类的私有信息,你必须有一个类的源码才能为一个类添加Extension,所以你无法为系统的类,比如NSString,添加Extension,详情请见官方文档说明。
但是Category则完全不一样,它是在运行期决议的。
就Category和Extension的区别来看,我们可以推导出一个明显的事实,Extension可以添加实例变量,而Category是无法添加实例变量的(对象的内存布局已经确定,如果添加实例变量就会破坏类的内部布局,这对编译型语言来说是灾难性的)
挑灯细览-Category真面目
我们知道,所有的OC类和对象,在runtime层都是用struct表示的,Category也不例外,在runtime层,Category用结构体category_t(在objc-runtime-new.h中可以找到此定义),它包含了:
- 类的名字(name)
- 类(cls)
- Category中所有给类添加的实例方法的列表(instanceMethods)
- Category中所有添加的类方法的列表(classMethods)
- Category实现的所有协议的列表(protocols)
- Category中添加的所有属性(instanceProperties)
1 | typedef struct category_t { |
从Category的定义也可以看出Category的可为(可以添加实例方法,类方法,甚至可以实现协议,添加属性)和不可为(无法添加实例变量)。
ok,我们先去写一个Category,看一个Category到底为何物:1
2
3
4
5
6
7
8
9
10
11
12
13
14
15#import <Foundation/Foundation.h>
@interface MyClass : NSObject
- (void)printName;
@end
@interface MyClass(MyAddition)
@property(nonatomic, copy) NSString *name;
- (void)printName;
@end
1 | #import "MyClass.h" |
我们使用clang的命令(clang -rewrite-objc MyClass.m),得到了一个3M大小,10w多行的.cpp文件,我们忽略掉所有和我们无关的东西,在文件的最后,我们找到了如下代码片段:1
2
3
4
5
6
7
8
9
10
11
12
13
14
15
16
17
18
19
20
21
22
23
24
25
26
27
28
29
30
31
32
33
34
35
36
37
38
39
40
41
42
43
44
45
46
47static struct /*_method_list_t*/ {
unsigned int entsize; // sizeof(struct _objc_method)
unsigned int method_count;
struct _objc_method method_list[1];
} _OBJC_$_CATEGORY_INSTANCE_METHODS_MyClass_$_MyAddition __attribute__ ((used, section ("__DATA,__objc_const"))) = {
sizeof(_objc_method),
1,
{{(struct objc_selector *)"printName", "v16@0:8", (void *)_I_MyClass_MyAddition_printName}}
};
static struct /*_prop_list_t*/ {
unsigned int entsize; // sizeof(struct _prop_t)
unsigned int count_of_properties;
struct _prop_t prop_list[1];
} _OBJC_$_PROP_LIST_MyClass_$_MyAddition __attribute__ ((used, section ("__DATA,__objc_const"))) = {
sizeof(_prop_t),
1,
{{"name","T@\"NSString\",C,N"}}
};
extern "C" __declspec(dllexport) struct _class_t OBJC_CLASS_$_MyClass;
static struct _category_t _OBJC_$_CATEGORY_MyClass_$_MyAddition __attribute__ ((used, section ("__DATA,__objc_const"))) =
{
"MyClass",
0, // &OBJC_CLASS_$_MyClass,
(const struct _method_list_t *)&_OBJC_$_CATEGORY_INSTANCE_METHODS_MyClass_$_MyAddition,
0,
0,
(const struct _prop_list_t *)&_OBJC_$_PROP_LIST_MyClass_$_MyAddition,
};
static void OBJC_CATEGORY_SETUP_$_MyClass_$_MyAddition(void ) {
_OBJC_$_CATEGORY_MyClass_$_MyAddition.cls = &OBJC_CLASS_$_MyClass;
}
#pragma section(".objc_inithooks$B", long, read, write)
__declspec(allocate(".objc_inithooks$B")) static void *OBJC_CATEGORY_SETUP[] = {
(void *)&OBJC_CATEGORY_SETUP_$_MyClass_$_MyAddition,
};
static struct _class_t *L_OBJC_LABEL_CLASS_$ [1] __attribute__((used, section ("__DATA, __objc_classlist,regular,no_dead_strip")))= {
&OBJC_CLASS_$_MyClass,
};
static struct _class_t *_OBJC_LABEL_NONLAZY_CLASS_$[] = {
&OBJC_CLASS_$_MyClass,
};
static struct _category_t *L_OBJC_LABEL_CATEGORY_$ [1] __attribute__((used, section ("__DATA, __objc_catlist,regular,no_dead_strip")))= {
&_OBJC_$_CATEGORY_MyClass_$_MyAddition,
};
我们可以看到:
- 首先编译器生成了实例方法列表
OBJC$_CATEGORY_INSTANCE_METHODSMyClass$_MyAddition和属性列表OBJC$_PROP_LISTMyClass$_MyAddition,两者的命名都遵循了公共前缀+类名+Category名字的命名方式,而且实例方法列表里面填充的正是我们在MyAddition这个Category里面写的方法printName,而属性列表里面填充的也正是我们在MyAddition里添加的name属性。还有一个需要注意到的事实就是Category的名字用来给各种列表以及后面的Category结构体本身命名,而且有static来修饰,所以在同一个编译单元里我们的Category名不能重复,否则会出现编译错误。 - 其次,编译器生成了Category本身
OBJC$_CATEGORYMyClass$_MyAddition,并用前面生成的列表来初始化Category本身。 - 最后,编译器在DATA段下的
objc_catlist section里保存了一个大小为1的category_t的数组L_OBJC_LABELCATEGORY$(当然,如果有多个Category,会生成对应长度的数组),用于运行期Category的加载。
追本溯源-Category如何加载
我们知道,Objective-C的运行时是依赖OC的runtime的,而OC的runtime和其他系统库一样,是OS X和iOS通过dyld动态加载的。想了解更多dyld的同学可以移步这里:传送门
对于OC运行时,入口方法如下(在objc-os.mm文件中):1
2
3
4
5
6
7
8
9
10
11
12
13
14
15
16
17
18void _objc_init(void)
{
static bool initialized = false;
if (initialized) return;
initialized = true;
// fixme defer initialization until an objc-using image is found?
environ_init();
tls_init();
lock_init();
exception_init();
// Register for unmap first, in case some +load unmaps something
_dyld_register_func_for_remove_image(&unmap_image);
dyld_register_image_state_change_handler(dyld_image_state_bound,
1/*batch*/, &map_images);
dyld_register_image_state_change_handler(dyld_image_state_dependents_initialized, 0/*not batch*/, &load_images);
}
Category被附加到类上面是在map_images的时候发生的,在new-ABI的标准下,_objc_init里面的调用的map_images最终会调用objc_runtime-new.mm里面的_read_images方法,而在_read_images方法的结尾,有以下的代码片段:1
2
3
4
5
6
7
8
9
10
11
12
13
14
15
16
17
18
19
20
21
22
23
24
25
26
27
28
29
30
31
32
33
34
35
36
37
38
39
40
41
42
43
44
45
46
47
48
49
50
51
52
53
54// Discover categories.
for (EACH_HEADER) {
category_t **catlist =
_getObjc2CategoryList(hi, &count);
for (i = 0; i < count; i++) {
category_t *cat = catlist[i];
class_t *cls = remapClass(cat->cls);
if (!cls) {
// Category's target class is missing (probably weak-linked).
// Disavow any knowledge of this category.
catlist[i] = NULL;
if (PrintConnecting) {
_objc_inform("CLASS: IGNORING category \?\?\?(%s) %p with "
"missing weak-linked target class",
cat->name, cat);
}
continue;
}
// Process this category.
// First, register the category with its target class.
// Then, rebuild the class's method lists (etc) if
// the class is realized.
BOOL classExists = NO;
if (cat->instanceMethods || cat->protocols
|| cat->instanceProperties)
{
addUnattachedCategoryForClass(cat, cls, hi);
if (isRealized(cls)) {
remethodizeClass(cls);
classExists = YES;
}
if (PrintConnecting) {
_objc_inform("CLASS: found category -%s(%s) %s",
getName(cls), cat->name,
classExists ? "on existing class" : "");
}
}
if (cat->classMethods || cat->protocols
/* || cat->classProperties */)
{
addUnattachedCategoryForClass(cat, cls->isa, hi);
if (isRealized(cls->isa)) {
remethodizeClass(cls->isa);
}
if (PrintConnecting) {
_objc_inform("CLASS: found category +%s(%s)",
getName(cls), cat->name);
}
}
}
}
首先,我们拿到的catlist就是上节中讲到的编译器为我们准备的category_t数组,关于是如何加载catlist本身的,我们暂且不表,这和Category本身的关系也不大,有兴趣的同学可以去研究下Apple的二进制格式和load机制。
略去PrintConnecting这个用于log的东西,这段代码很容易理解:
- 把Category的实例方法、协议以及属性添加到类上
- 把Category的类方法和协议添加到类的metaclass上
值得注意的是,在代码中有一小段注释 / || cat->classProperties /,看来苹果有过给类添加属性的计划啊。
ok,我们接着往里看,Category的各种列表是怎么最终添加到类上的,就拿实例方法列表来说吧:在上述的代码片段里,addUnattachedCategoryForClass只是把类和Category做一个关联映射,而remethodizeClass才是真正去处理添加事宜的功臣。1
2
3
4
5
6
7
8
9
10
11
12
13
14
15
16
17
18
19
20
21
22
23
24
25
26
27
28
29
30
31
32
33
34
35
36
37
38
39
40
41
42
43static void remethodizeClass(class_t *cls)
{
category_list *cats;
BOOL isMeta;
rwlock_assert_writing(&runtimeLock);
isMeta = isMetaClass(cls);
// Re-methodizing: check for more categories
if ((cats = unattachedCategoriesForClass(cls))) {
chained_property_list *newproperties;
const protocol_list_t **newprotos;
if (PrintConnecting) {
_objc_inform("CLASS: attaching categories to class '%s' %s",
getName(cls), isMeta ? "(meta)" : "");
}
// Update methods, properties, protocols
BOOL vtableAffected = NO;
attachCategoryMethods(cls, cats, &vtableAffected);
newproperties = buildPropertyList(NULL, cats, isMeta);
if (newproperties) {
newproperties->next = cls->data()->properties;
cls->data()->properties = newproperties;
}
newprotos = buildProtocolList(cats, NULL, cls->data()->protocols);
if (cls->data()->protocols && cls->data()->protocols != newprotos) {
_free_internal(cls->data()->protocols);
}
cls->data()->protocols = newprotos;
_free_internal(cats);
// Update method caches and vtables
flushCaches(cls);
if (vtableAffected) flushVtables(cls);
}
}
而对于添加类的实例方法而言,又会去调用attachCategoryMethods这个方法,我们去看下attachCategoryMethods:1
2
3
4
5
6
7
8
9
10
11
12
13
14
15
16
17
18
19
20
21
22
23
24
25
26
27static void attachCategoryMethods(class_t *cls, category_list *cats,
BOOL *inoutVtablesAffected)
{
if (!cats) return;
if (PrintReplacedMethods) printReplacements(cls, cats);
BOOL isMeta = isMetaClass(cls);
method_list_t **mlists = (method_list_t **)
_malloc_internal(cats->count * sizeof(*mlists));
// Count backwards through cats to get newest categories first
int mcount = 0;
int i = cats->count;
BOOL fromBundle = NO;
while (i--) {
method_list_t *mlist = cat_method_list(cats->list[i].cat, isMeta);
if (mlist) {
mlists[mcount++] = mlist;
fromBundle |= cats->list[i].fromBundle;
}
}
attachMethodLists(cls, mlists, mcount, NO, fromBundle, inoutVtablesAffected);
_free_internal(mlists);
}
attachCategoryMethods做的工作相对比较简单,它只是把所有Category的实例方法列表拼成了一个大的实例方法列表,然后转交给了attachMethodLists方法,这个方法有点长,我们只看一小段:1
2
3
4
5
6
7
8
9
10
11
12
13
14
15
16
17
18
19
20
21
22
23for (uint32_t m = 0; (scanForCustomRR || scanForCustomAWZ) && m < mlist->count;
m++)
{
SEL sel = method_list_nth(mlist, m)->name;
if (scanForCustomRR && isRRSelector(sel)) {
cls->setHasCustomRR();
scanForCustomRR = false;
} else if (scanForCustomAWZ && isAWZSelector(sel)) {
cls->setHasCustomAWZ();
scanForCustomAWZ = false;
}
}
// Fill method list array
newLists[newCount++] = mlist;
.
.
.
// Copy old methods to the method list array
for (i = 0; i < oldCount; i++) {
newLists[newCount++] = oldLists[i];
}
需要注意的有两点:
- Category的方法没有“完全替换掉”原来类已经有的方法,也就说如果Category和原来类都有methodA,那么Category附件完成之后,类的方法列表里会有两个methodA。
- Category的方法被放到了新方法列表的前面,而原来类的方法被放到了新方法列表的后面,这也就是我们平常所说的Category的方法会“覆盖”掉原来类的同名方法,这是因为运行时在查找方法的时候是顺着方法列表的顺序查找的,它主要一找到对应名字的方法,就会罢休,殊不知后面可能还有一样名字的方法。
旁支末叶-Category和+load方法
我们知道,在类和Category中都可以有+load方法,那么有两个问题:
- 在类的+load方法调用的时候,我们可以调用Category中声明的方法么?
- 这么几个+load方法,调用顺序是怎样的呢?
鉴于上述几节我们看的代码太多了,对于这两个问题,我们先来看一点直观的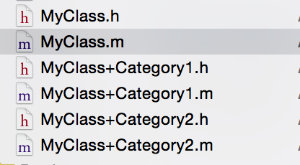
我们的代码里有MyClass和MyClass的两个Category(Category1和Category2),MyClass和两个Category都添加了+load方法,并且Category1和Category2都写了MyClass的printName方法。
在Xcode中点击Edit Scheme,添加如下两个环境变量(可以在执行load方法以及加载Category的时候打印log信息,更多的环境变量选项可参见objc-private.h):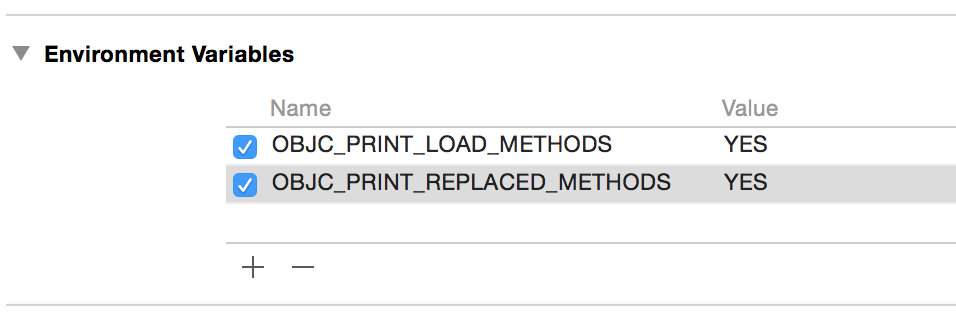
运行项目,我们会看到控制台打印很多东西,我们只找我们想要的信息,顺序如下:1
2
3
4
5
6
7
8
9
10
11
12
13
14
15
16
17objc[1187]: REPLACED: -[MyClass printName] by category Category1
objc[1187]: REPLACED: -[MyClass printName] by category Category2
.
.
.
objc[1187]: LOAD: class 'MyClass' scheduled for +load
objc[1187]: LOAD: category 'MyClass(Category1)' scheduled for +load
objc[1187]: LOAD: category 'MyClass(Category2)' scheduled for +load
objc[1187]: LOAD: +[MyClass load]
.
.
.
objc[1187]: LOAD: +[MyClass(Category1) load]
.
.
.
objc[1187]: LOAD: +[MyClass(Category2) load]
所以,对于上面两个问题,答案是很明显的:
- 可以调用,因为附加Category到类的工作会先于+load方法的执行
- +load的执行顺序是先类,后Category,而Category的+load执行顺序是根据编译顺序决定的。
目前的编译顺序是这样的: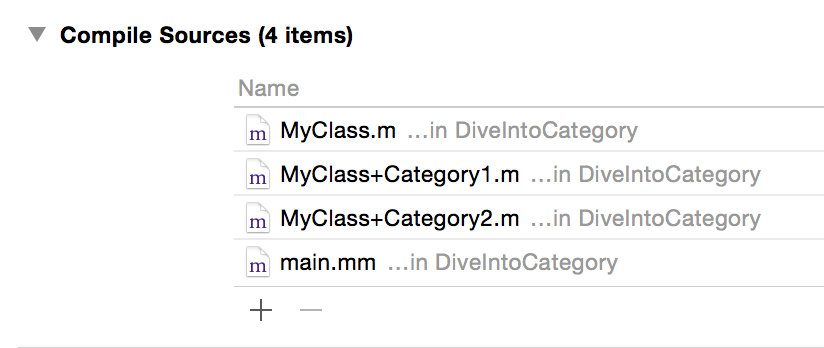
我们调整一下Category1和Category2的编译顺序,如下图所示,run。ok,我们可以看到控制台的输出顺序变了:
1
2
3
4
5
6
7
8
9
10
11
12
13
14
15
16
17objc[1187]: REPLACED: -[MyClass printName] by category Category2
objc[1187]: REPLACED: -[MyClass printName] by category Category1
.
.
.
objc[1187]: LOAD: class 'MyClass' scheduled for +load
objc[1187]: LOAD: category 'MyClass(Category2)' scheduled for +load
objc[1187]: LOAD: category 'MyClass(Category1)' scheduled for +load
objc[1187]: LOAD: +[MyClass load]
.
.
.
objc[1187]: LOAD: +[MyClass(Category2) load]
.
.
.
objc[1187]: LOAD: +[MyClass(Category1) load]
虽然对于+load的执行顺序是这样,但是对于“覆盖”掉的方法,则会先找到最后一个编译的Category里的对应方法。
这一节我们只是用很直观的方式得到了问题的答案,有兴趣的同学可以继续去研究一下OC的运行时代码。
触类旁通-Category和方法覆盖
鉴于上面几节我们已经把原理都讲了,这一节只有一个问题:怎么调用到原来类中被Category覆盖掉的方法?
对于这个问题,我们已经知道Category其实并不是完全替换掉原来类的同名方法,只是Category在方法列表的前面而已,所以我们只要顺着方法列表找到最后一个对应名字的方法,就可以调用原来类的方法:1
2
3
4
5
6
7
8
9
10
11
12
13
14
15
16
17
18
19
20
21
22
23
24
25Class currentClass = [MyClass class];
MyClass *my = [[MyClass alloc] init];
if (currentClass) {
unsigned int methodCount;
Method *methodList = class_copyMethodList(currentClass, &methodCount);
IMP lastImp = NULL;
SEL lastSel = NULL;
for (NSInteger i = 0; i < methodCount; i++) {
Method method = methodList[i];
NSString *methodName = [NSString stringWithCString:sel_getName(method_getName(method))
encoding:NSUTF8StringEncoding];
if ([@"printName" isEqualToString:methodName]) {
lastImp = method_getImplementation(method);
lastSel = method_getName(method);
}
}
typedef void (*fn)(id,SEL);
if (lastImp != NULL) {
fn f = (fn)lastImp;
f(my,lastSel);
}
free(methodList);
}
更上一层-Category和关联对象
如上所见,我们知道在Category里面是无法为Category添加实例变量的。但是我们很多时候需要在Category中添加和对象关联的值,这个时候可以求助关联对象来实现。1
2
3
4
5
6
7/// MyClass+Category1.h:
#import "MyClass.h"
@interface MyClass (Category1)
@property(nonatomic,copy) NSString *name;
@end
1 | /// MyClass+Category1.m: |
但是关联对象又是存在什么地方的呢?如何存储?对象销毁时候如何处理关联对象呢?我们去翻一下runtime的源码,在objc-references.mm文件中有个方法_object_set_associative_reference:1
2
3
4
5
6
7
8
9
10
11
12
13
14
15
16
17
18
19
20
21
22
23
24
25
26
27
28
29
30
31
32
33
34
35
36
37
38
39
40
41
42
43
44void _object_set_associative_reference(id object, void *key, id value, uintptr_t policy) {
// retain the new value (if any) outside the lock.
ObjcAssociation old_association(0, nil);
id new_value = value ? acquireValue(value, policy) : nil;
{
AssociationsManager manager;
AssociationsHashMap &associations(manager.associations());
disguised_ptr_t disguised_object = DISGUISE(object);
if (new_value) {
// break any existing association.
AssociationsHashMap::iterator i = associations.find(disguised_object);
if (i != associations.end()) {
// secondary table exists
ObjectAssociationMap *refs = i->second;
ObjectAssociationMap::iterator j = refs->find(key);
if (j != refs->end()) {
old_association = j->second;
j->second = ObjcAssociation(policy, new_value);
} else {
(*refs)[key] = ObjcAssociation(policy, new_value);
}
} else {
// create the new association (first time).
ObjectAssociationMap *refs = new ObjectAssociationMap;
associations[disguised_object] = refs;
(*refs)[key] = ObjcAssociation(policy, new_value);
_class_setInstancesHaveAssociatedObjects(_object_getClass(object));
}
} else {
// setting the association to nil breaks the association.
AssociationsHashMap::iterator i = associations.find(disguised_object);
if (i != associations.end()) {
ObjectAssociationMap *refs = i->second;
ObjectAssociationMap::iterator j = refs->find(key);
if (j != refs->end()) {
old_association = j->second;
refs->erase(j);
}
}
}
}
// release the old value (outside of the lock).
if (old_association.hasValue()) ReleaseValue()(old_association);
}
我们可以看到所有的关联对象都由AssociationsManager管理,而AssociationsManager定义如下:1
2
3
4
5
6
7
8
9
10
11
12
13class AssociationsManager {
static OSSpinLock _lock;
static AssociationsHashMap *_map; // associative references: object pointer -> PtrPtrHashMap.
public:
AssociationsManager() { OSSpinLockLock(&_lock); }
~AssociationsManager() { OSSpinLockUnlock(&_lock); }
AssociationsHashMap &associations() {
if (_map == NULL)
_map = new AssociationsHashMap();
return *_map;
}
};
AssociationsManager里面是由一个静态AssociationsHashMap来存储所有的关联对象的。这相当于把所有对象的关联对象都存在一个全局map里面。而map的key是这个对象的指针地址(任意两个不同对象的指针地址一定是不同的),而这个map的value又是另外一个AssociationsHashMap,里面保存了关联对象的key-value对。
而在对象的销毁逻辑里面,见objc-runtime-new.mm:1
2
3
4
5
6
7
8
9
10
11
12
13
14
15
16
17
18
19void *objc_destructInstance(id obj)
{
if (obj) {
Class isa_gen = _object_getClass(obj);
class_t *isa = newcls(isa_gen);
// Read all of the flags at once for performance.
bool cxx = hasCxxStructors(isa);
bool assoc = !UseGC && _class_instancesHaveAssociatedObjects(isa_gen);
// This order is important.
if (cxx) object_cxxDestruct(obj);
if (assoc) _object_remove_assocations(obj);
if (!UseGC) objc_clear_deallocating(obj);
}
return obj;
}
runtime的销毁对象函数objc_destructInstance里面会判断这个对象有没有关联对象,如果有,会调用_object_remove_assocations做关联对象的清理工作。
后记
正如侯捷先生所讲“源码面前,了无秘密”,Apple的Cocoa Touch框架虽然并不开源,但是Objective-C的runtime和Core Foundation却是完全开放源码的(在https://opensource.apple.com/tarballs/ 可以下载到全部的开源代码)